Tips and Techniques for Working with Images in Publisher

Microsoft Publisher is a powerful desktop publishing tool, and images are a crucial element in creating visually appealing publications. Whether you’re designing brochures, newsletters, or flyers, effectively working with images can elevate your designs. Here are some essential tips and tricks to help you become an image pro in Publisher:
1. Inserting Images:
- Drag and Drop: The simplest way to insert an image is to drag it from your file explorer directly onto your Publisher page.
- Insert Menu: Go to the “Insert” tab and click on “Pictures” to browse and select images from your computer.
- Online Pictures: Publisher also allows you to search for images online using Bing Image Search directly from the “Insert” tab.

2. Formatting Images:
- Resize: Click and drag the corner handles of an image to resize it proportionally. Hold the Shift key while dragging to maintain the aspect ratio.
- Crop: Use the “Crop” tool under the “Picture Tools Format” tab to remove unwanted parts of an image.
- Adjust Brightness and Contrast: Fine-tune the appearance of your images by adjusting brightness, contrast, and other settings in the “Picture Tools Format” tab.
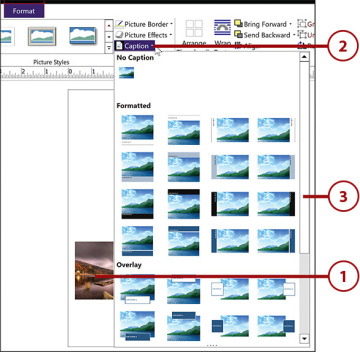
- Apply Effects: Add artistic effects like shadows, glows, reflections, or 3D rotations to enhance your images.

3. Wrapping Text Around Images:
- Wrap Text: Right-click on an image, select “Wrap Text,” and choose your preferred wrapping style (square, tight, through, top and bottom, etc.).
- Edit Wrap Points: Click “Edit Wrap Points” to customize the flow of text around an image more precisely.

4. Using Picture Placeholders:
- Create Placeholders: If you’re not sure which images to use yet, insert picture placeholders. This helps you plan your layout before finalizing your images.
- Replace Placeholders: Right-click on a placeholder and select “Change Picture” to easily swap it with your desired image.
5. Working with Image Groups:
- Group Images: Select multiple images and click “Group” under the “Picture Tools Format” tab to treat them as a single object.
- Ungroup Images: Right-click on a grouped image and select “Ungroup” to edit individual images separately.
6. Optimizing Images for Print:
- Resolution: Ensure your images have a resolution of at least 300 dpi (dots per inch) for high-quality printing.
- File Size: Compress large images to reduce file size without sacrificing too much quality. Use the “Compress Pictures” tool in the “Picture Tools Format” tab.
7. Additional Tips:
- Use High-Quality Images: Start with high-quality images to ensure the best results in your publications.
- Experiment: Don’t be afraid to experiment with different image formats, effects, and layouts to find what works best for your design.
- Get Inspired: Look at other publications for inspiration and ideas on how to use images effectively.
By mastering these tips and tricks, you’ll be well on your way to creating professional-looking publications with impactful images in Microsoft Publisher. Remember, practice makes perfect, so keep experimenting and exploring the various image editing features available in Publisher.
Next Reads
> Microsoft Publisher: Basic Tips and Tricks
> Expert Tips, Tricks, and Shortcuts to help you Maneuver Microsoft Office
> Top 14 Microsoft Word Tricks and Tips that you Should Know
> Top Ten Powerpoint Tips and Tricks you need to know

