How to Expertly Install Microsoft Office Applications: A Step-by-Step Guide
Microsoft Office is a suite of productivity tools used by millions of individuals and businesses worldwide. Applications like Word, Excel, PowerPoint, and Outlook are essential for daily tasks, from creating documents to managing emails. Whether you’re installing Microsoft Office for the first time or re-installing it, this guide will walk you through the steps to ensure a smooth installation process on your computer.
Step 1: Check System Requirements
Before installing Microsoft Office, ensure your computer meets the minimum system requirements. The requirements may vary based on the version of Office you are installing.
For Windows
- Operating System: Windows 10 or later.
- Processor: 1.6 GHz or faster, dual-core processor.
- RAM: 4 GB for 64-bit or 2 GB for 32-bit systems.
- Storage: At least 4 GB of free disk space.
- Display: 1280 x 768 resolution or higher.
For Mac
- Operating System: macOS Catalina or later.
- Processor: Intel or Apple Silicon (M1/M2).
- RAM: 4 GB minimum.
- Storage: At least 10 GB of free disk space.

Step 2: Purchase or Obtain Microsoft Office
You need a valid Microsoft Office license or subscription to install the software. Microsoft offers several options:
- Microsoft 365 Subscription: A subscription-based service with regular updates and access to cloud storage.
- One-Time Purchase: A perpetual license for a specific version of Office, such as Office 2021.
- Educational or Workplace Access: Some schools and workplaces provide Office for free or at a discounted rate.
Step 3: Sign In to Your Microsoft Account
To download and activate Microsoft Office, you need a Microsoft account. Follow these steps:
- Open your web browser and go to the Microsoft Office website.
- Click Sign In and log in with your Microsoft account credentials.
- If you don’t have an account, click Create one! and follow the prompts to set it up.

Step 4: Download the Office Installer
Once you’ve signed in, you can download the Office installer.
- After logging in, go to the Services & Subscriptions section.
- Locate your Office product and click Install Office.
- Choose the version (32-bit or 64-bit) based on your system compatibility, then download the installer.

Step 5: Install Microsoft Office on Your Computer
After downloading the installer, proceed with the installation.
For Windows
- Locate the downloaded file (usually in the Downloads folder) and double-click it.
- Click Yes if prompted by the User Account Control (UAC).
- The installer will start downloading necessary files. This process may take a few minutes, depending on your internet speed.
- Once the installation is complete, click Close.

For Mac
- Open the downloaded
.pkgfile. - Follow the on-screen instructions to agree to the terms and conditions.
- Enter your Mac’s administrator password when prompted.
- Once the installation is complete, click Close.
Step 6: Activate Microsoft Office
Activating Microsoft Office is crucial to access all features. Follow these steps:
- Open any Office application (e.g., Word or Excel).
- You’ll be prompted to sign in with your Microsoft account. Enter your credentials.
- If required, enter the product key that came with your Office purchase.
- Follow the on-screen instructions to complete the activation.
Step 7: Update Microsoft Office
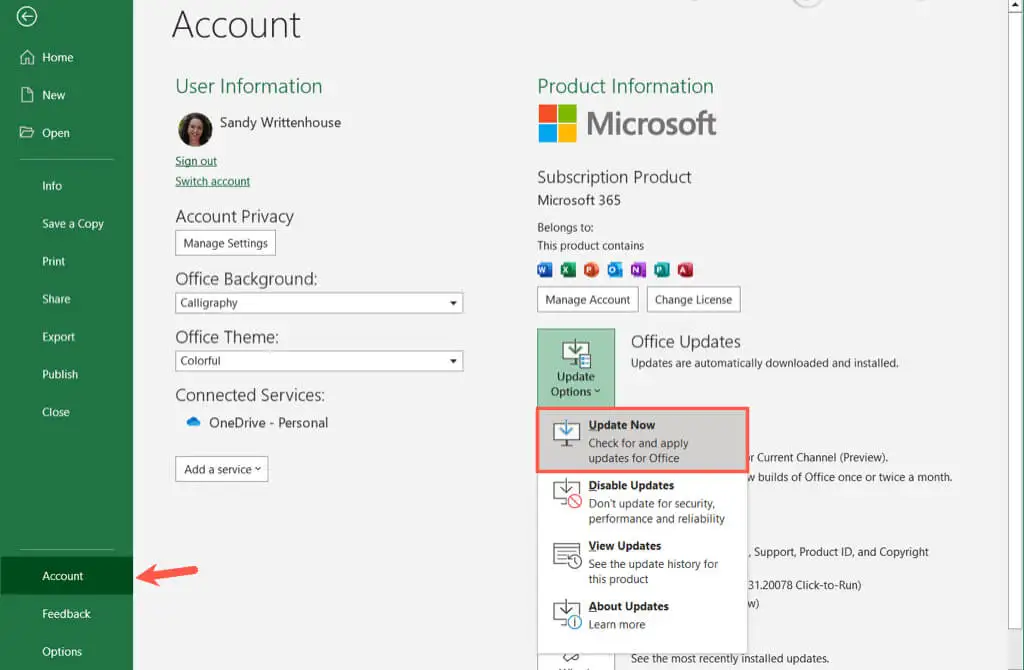
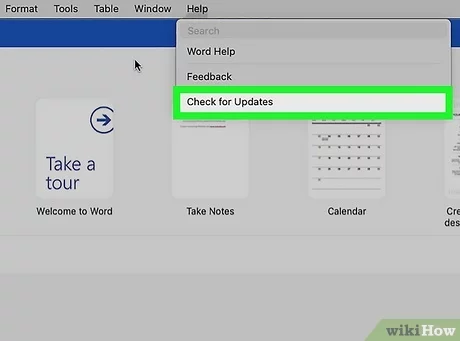
Keeping Office up to date ensures you have the latest features and security improvements. To check for updates:
- Windows:
- Open any Office app and go to File > Account > Update Options.
- Click Update Now.

- Mac:
- Open any Office app and go to Help > Check for Updates.
- Follow the prompts to install updates.

Additional Tips and Troubleshooting
Manage Your Office Licenses
- If you have multiple devices, you can manage your Office installations from your Microsoft account. Go to the Services & Subscriptions section and deactivate installations on devices you no longer use.
Switch Between Office Plans
- If you’ve upgraded to a new Office plan, sign out of your account on all devices, then log back in to activate the new subscription.
Error During Installation?
- Insufficient Disk Space: Clear unnecessary files to free up space.
- Slow Download Speed: Check your internet connection or try downloading the installer during off-peak hours.
- Compatibility Issues: Ensure your operating system is up to date.
Uninstalling Previous Versions
- If you’re upgrading from an older version of Office, uninstall it first to avoid conflicts.
- Windows: Go to Control Panel > Programs and Features, select Microsoft Office, and click Uninstall.
- Mac: Drag the Office apps to the Trash and empty it.
Conclusion
Installing Microsoft Office on your computer is a straightforward process that requires just a few steps, from downloading the installer to activating the software. With this guide, you can ensure a seamless installation experience and start using Office applications efficiently.
Whether you’re using Office for personal, professional, or academic purposes, keeping it up to date and managing your subscription wisely will help you get the most out of this powerful suite of tools.
