


Creating Columns in Microsoft Word
Creating columns in Microsoft Word can transform a simple document into a more engaging and professional layout. Whether you’re designing a newsletter, a brochure, or formatting a report, using columns allows you to organize content in a visually appealing way. Microsoft Word offers flexible options for customizing columns, and in this guide, you’ll learn how to create and manage them easily.
Let’s explore how to create columns in Word, from basic layouts to advanced formatting tips.
What Are Columns in Word?
Columns divide your document’s text into vertical sections, similar to a newspaper or magazine layout. Instead of reading across the full width of the page, readers follow text down one column and then continue at the top of the next column.
This layout is ideal for:
-
Newsletters
-
Flyers and brochures
-
Articles and editorial content
-
Resumes or CVs (in some styles)
How to Add Columns in Microsoft Word
Using the Layout Tab (Best for Entire Document)
This is the most straightforward method for applying columns to your entire document.
Steps:
-
Open your Word document.
-
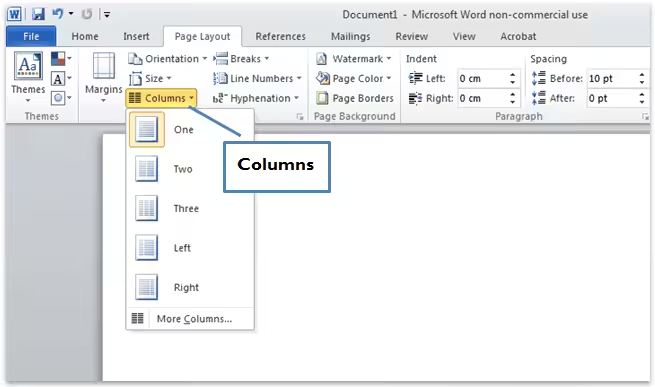
Go to the Layout tab on the Ribbon.
-
Click on Columns in the Page Setup group.
-
Choose one of the preset options: One, Two, Three, Left, or Right.
-
One: Default layout with no columns.
-
Two: Splits the text into two equal-width columns.
-
Three: Creates three equal columns.
-
Left: A narrow column on the left, wider on the right.
-
Right: Opposite of Left.
-
-
Your entire document will now follow the selected column format.
Applying Columns to Part of a Document
You might only want columns for a section of your text, such as a specific paragraph or a part of a newsletter. Word allows you to select text and apply columns just to that area.
Steps:
-
Highlight the text you want to format into columns.
-
Go to the Layout tab.
-
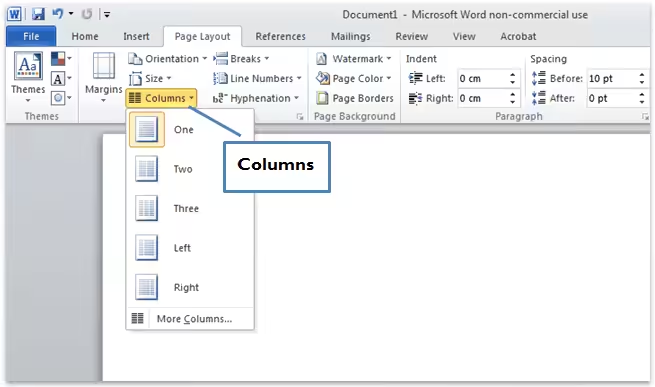
Click Columns, then select More Columns.
-
In the dialog box, choose how many columns you want.
-
Check the option “Apply to: Selected text” at the bottom.
-
Click OK.
This will format only the highlighted portion into columns while keeping the rest of the document unchanged.
Customizing Column Settings
Adjusting Width and Spacing
To fine-tune how your columns appear:
-
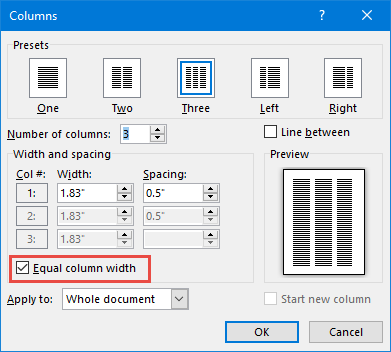
Click Layout > Columns > More Columns.
-
In the dialog box, adjust:
-
Number of columns
-
Width of each column
-
Spacing between columns
-
-
If you want each column to have different widths, uncheck the box “Equal column width”.
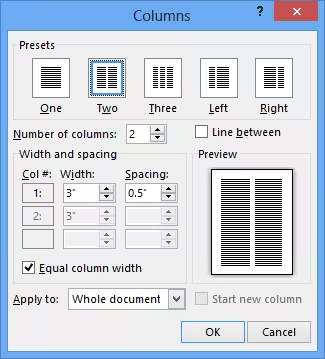
This allows for creative and functional layouts, such as one narrow column for images or pull quotes and a wider column for the main text.
Adding a Line Between Columns
If you’d like a visual separator between your columns:
-
Go to Layout > Columns > More Columns.
-
In the dialog box, check the box “Line between”.
-
Click OK.
A vertical line will now appear between your columns, enhancing readability and design.
How to Insert a Column Break
Column breaks force the text to move to the next column before the current one is full. This is useful for starting a new section or heading in the next column.
Steps:
-
Place the cursor where you want to end the column.
-
Go to the Layout tab.
-
Click Breaks, then select Column.
The content after the break will move to the top of the next column.
Creating Columns in Word Online
If you’re using the web version of Microsoft Word, the steps are similar but slightly limited.
Steps for Word Online:
-
Highlight the text you want to divide into columns.
-
Click on the Layout tab.
-
Select Columns.
-
Choose One, Two, or Three.
-
You can’t customize spacing or lines in Word Online, but basic formatting works well.
For more advanced control, you’ll need to switch to the desktop version.
Practical Use Cases and Ideas
Here are a few examples of how you might use columns in real-world documents:
-
Newsletter: Two or three columns create an easy-to-read layout similar to newspapers.
-
Brochure: Combine images, headings, and bullet points across multiple columns for a visually appealing format.
-
Reference material: Use columns to list side-by-side comparisons or summaries.
Tips for Working with Columns
-
Preview often: Use the Print Layout view to see how your columns will look.
-
Avoid clutter: Don’t overuse columns; they’re most effective when the layout is clean and simple.
-
Use Styles: Apply consistent formatting across columns using Word’s built-in styles.
-
Combine with images or tables: Place images in one column and text in another for a professional effect.
How to Remove Columns
If you decide to revert to a standard layout:
-
Select the text or section with columns.
-
Go to Layout > Columns.
-
Select One to remove all columns from the selection.
Word will return the text to the default single-column format.
Conclusion
Using columns in Microsoft Word is an excellent way to create professional-looking documents that are easier to read and better organized. Whether you’re working on a newsletter, a flyer, or a formal paper, mastering column formatting gives your content structure and polish.
With multiple options for customization and a user-friendly interface, Word makes it easy to apply columns to your entire document or just a portion of it. Practice these techniques, and soon you’ll be designing documents with layout skills that stand out.